
How to Plan Your First Homestead Garden
All about Layout, Zones, and Succession Planting
Published 7/20/2026
Starting your first homestead garden is one of the most rewarding steps toward self-sufficiency. Whether you have a small backyard in Boston or a larger plot, thoughtful planning turns a simple patch of dirt into a productive, beautiful space that feeds your family and supports local birds and pollinators.
Focus on smart layout, permaculture-inspired zones, and succession planting to maximize harvests year-round while keeping maintenance manageable.
Step 1: Assess Your Site and Goals

Begin by spending time observing your land. Walk the area at different times of day and note the following:
- Sun exposure — Most vegetables need 6–8 hours of full sun daily.
- Soil quality — Test pH and nutrients; amend heavily with compost.
- Water access and drainage — Avoid low spots that stay soggy.
- Microclimates, wind patterns, and existing features — Trees, slopes, fences, etc.
- Your family’s needs — Start small (200–500 sq ft) and scale up.
Pro Tip: Integrate bird-friendly elements like native flowers, berry bushes, and shallow water sources to attract pollinators and natural pest controllers.
Step 2: Design Your Garden Layout

A well-thought-out layout saves time and increases yield. Key principles:
- Use raised beds (max 4 ft wide for easy reach).
- Orient beds north-south so tall plants don’t shade shorter ones.
- Keep pathways 18–24 inches wide for comfortable access.
- Include space for compost, tools, and seating.
Simple Starter Layout Ideas
- Kitchen Garden (closest to house): Herbs, salad greens, cherry tomatoes.
- Main Production Area: Larger beds for beans, squash, root crops.
- Leave room for wildlife corridors and future expansion.
Step 3: Understand and Apply Permaculture Zones
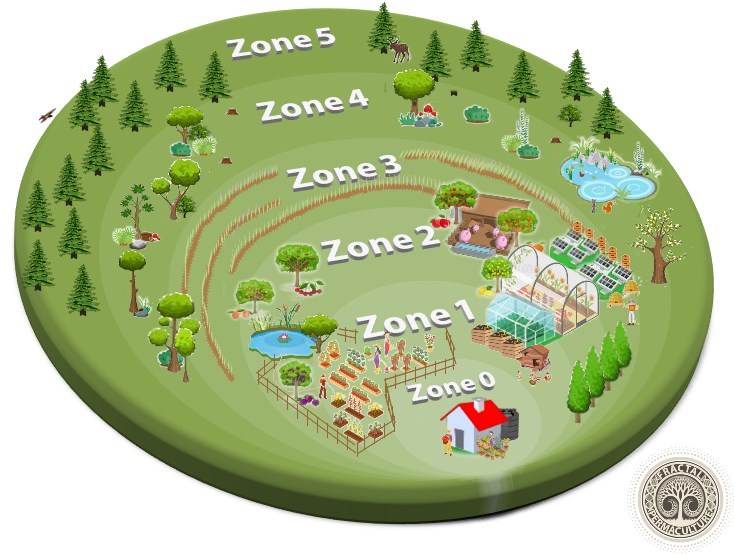
Permaculture zones organize your space by frequency of use, dramatically reducing daily effort.
- Zone 0: Inside your home (the center of activity).
- Zone 1: Right outside the kitchen door — daily harvest items (herbs, greens, compost).
- Zone 2: Frequent visits — main vegetable beds, small fruit trees, chicken area.
- Zone 3+: Occasional access — orchards, larger crops, wilder areas for birds and perennials.
Place high-maintenance plants close to the house and low-maintenance ones farther away.
Step 4: Master Succession Planting for Continuous Harvests

Succession planting means staggering your plantings so you have a steady supply instead of one big glut.
How to Implement Succession Planting
- Know your local frost dates (Boston area: last spring frost ~mid-May, first fall frost ~mid-October).
- Sow quick-maturing crops (radishes, lettuce) every 1–3 weeks.
- Replace harvested crops immediately — e.g., peas → beans, summer squash → kale.
- Track days to maturity in a simple calendar or spreadsheet.
Example Succession Plan for One Bed
- Spring: Lettuce, spinach, radishes.
- Early Summer: Bush beans or carrots.
- Late Summer/Fall: Kale, beets, Swiss chard, or overwintering greens.
This technique keeps your beds productive all season long.
Step 5: Additional Planning Tips

- Soil Health: Mulch heavily, rotate crops annually, and build soil with compost.
- Watering: Install drip irrigation or soaker hoses on timers.
- Companions & Biodiversity: Interplant flowers (marigolds, nasturtiums) and herbs to deter pests and attract beneficial birds.
- Start Small: Begin with 3–4 raised beds and expand based on what works.
- Record Keeping: Keep a garden journal with planting dates, yields, and lessons learned.
Final Thoughts
Planning your first homestead garden lays the foundation for years of abundance and joy. Start with careful observation, clear zones, a practical layout, and succession planting — you’ll soon be enjoying fresh produce, richer soil, and a garden alive with birds and beneficial wildlife.
Experiment, learn from each season, and don’t be afraid to adjust. Your homestead journey begins with that very first bed!
Happy Gardening! 🌱🐦